Potential Project Tuesday Vol. 2 // DIY J.Crew Inspired Vest

October 28, 2014

So I don't know about you, but now that it's fall I can't seem to get on Pinterest without coming across this J.Crew vest. I've never actually seen this vest in person (I really do need to get out more), so it was only the other day that I realized that it isn't actually made out of tweed, it's just printed nylon. WUT?! Maybe I'm just super cheap but for a $100+ jacket I expect it to be made out of something other than polyester. In fact, I'm pretty sure I could make an actual wool one for less than half that price.
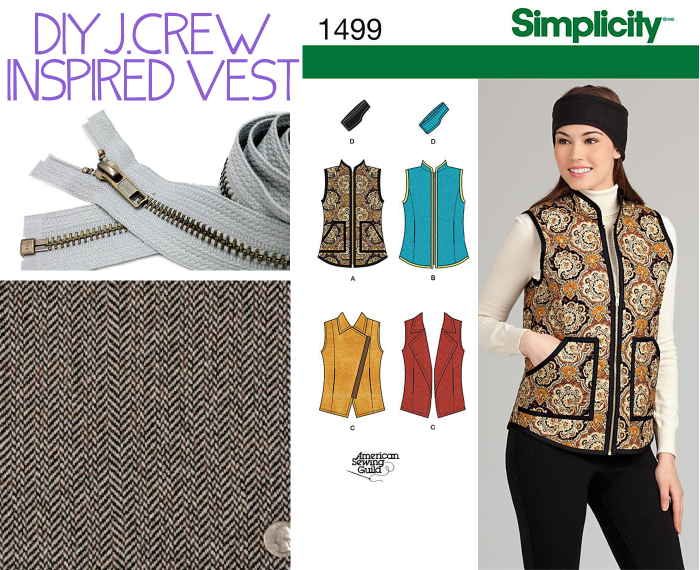
DIY J.Crew Inspired Vest // Potential Project Tuesday Vol. 2 by Hey, it's SJ
(Click on images for product information)
One of the hardest parts (which I don't even think would be that hard) would be quilting the fabric. I would cut the outer, interlining, and lining fabric into smaller pieces that are several inches larger on all sides than each of the pattern pieces, make a little interlining sandwich, and then get to quilting. This post about cross hatch quilting would be a good reference. 

Here's a quick little list of the materials needed and some sources: 

Lining-- I would probably use an affordable Ambiance/bemberg lining, but silk charmeuse or silk crepe de chine would also be options for a luxe vest. 

Interlining-- For a super warm vest, I'm really interested in using Thinsulate


Bias Tape-- The quick and dirty way would obviously be to use store-bought tape. Alternatively, you could get a really nice quality cotton and make your own. 

Zipper-- My only condition would be that it is separating (obviously), and metal, because I hate the look of those plastic parka zippers that they sell at Joann's/Hancock. Something like this but in black would work.

And an estimated cost break down...

$20/yd for a decent wool outer fabric (and I would get 1.5 yards to be safe) = $30
$8/yd for lining (again, 1.5 yards) = $12
$8/yd for Thinsulate (again, 1.5 yards) = $12
$6 for bias tape (store bought or homemade)
$5 for a zipper

Total = $65 IF everything was purchased at full price (and that's a big if because you know I love a good sale!)

I think this would be relatively simple as far as sewing outwear goes (there are no sleeves!) and I think the results would be absolutely amazingggg. And for only about $65 worth of materials it wouldn't break the bank! Someone please make one of these up so I can live vicariously through you :)
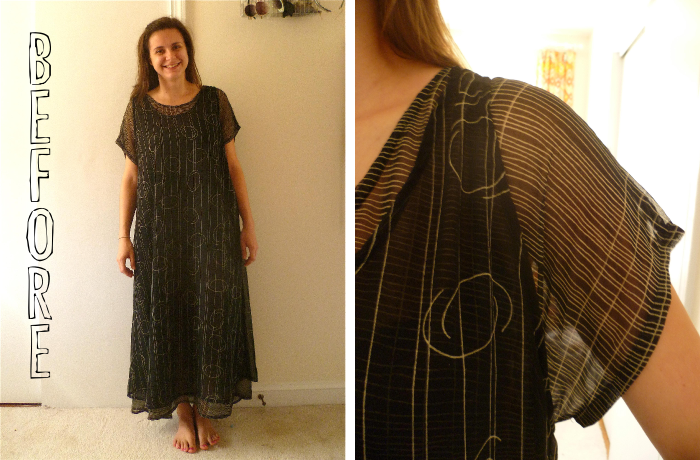

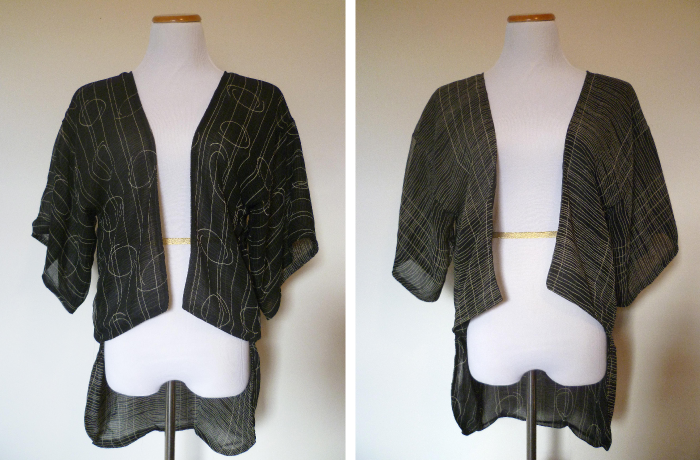
DIY Reversible Kimono Refashion

October 25, 2014

I was pretty excited when I found this dress at my local Goodwill. You may be wondering why, since it is obviously just a big shapeless sack on me. Well, let me tell you: 1. The larger size/longer length means more fabric, 2. It was actually 2(!) whole dresses (the outer tank dress and inner short sleeved one) sewn together at the shoulder seams, which means double fabric, and 3. It had a yellow tag, which just so happened to be that week's 50% off color. SOLD.
reversible kimono before
Since I had a lot of fabric, I thought this would be the perfect time to jump on the DIY kimono bandwagon (seriously, these things are all over the blogosphere right now). Although my sister (who was shopping with me that day) didn't care for them, I really liked the prints on both of the dresses. I played around with the idea of doing a contrast sleeve or back, but then decided to just make two kimonos. This quickly turned into sewing the two together to create a reversible kimono, and voilĂ !
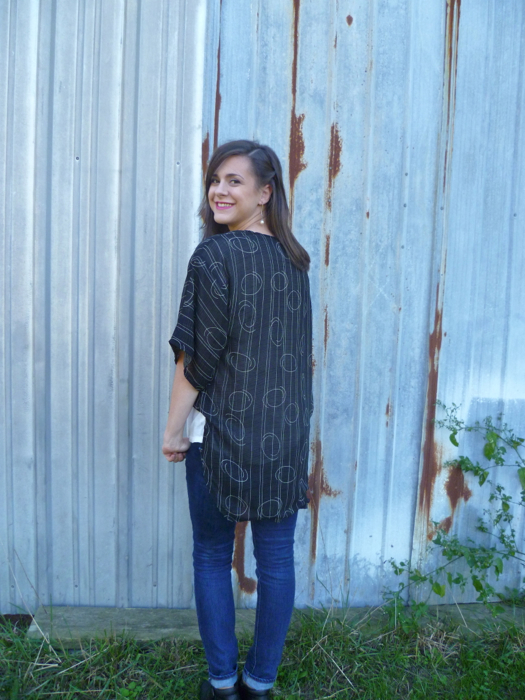
DIY Reversible Kimono Refashion from Dress by Hey, it's SJ
As far as the pattern/construction goes... I based my measurements for my pieces on this tutorial, but my front pieces were slightly shorter and my sleeves were a little more narrow. I sewed the shoulder, sleeves and side seams with french seams, and inserted the sleeves "on-the-flat" (before sewing the underarm or the side seams together, see this post). Inserting them this way was a lot easier with the chiffon, but I would also recommend it for any fabric with this pattern since there is absolutely no difference in the finished product and it is SO much easier.
DIY Reversible Kimono Refashion from Dress by Hey, it's SJ
To make it reversible, I sewed up the two kimonos, one from each of the dresses. Then with right sides together, I stitched along the front and bottom hems, leaving the back of the neck open to turn, and then turned the kimono right side out. To finish the sleeves I folded a 1/2 inch hem to the wrong side of each of the sleeves (each side has two sleeves, so I had to do this 4 times), then I pinned the two sleeves on each side together and top stitched them, creating a single sleeve with no raw edges. I closed the hole in the neckline just by topstitching, and then also topstitched around the front and bottom hems to give the edges a cleaner finish.
DIY Reversible Kimono Refashion from Dress - front side 2 by Hey, it's SJ
I have to say, I struggled through pretty much every step of this process, not because it was hard, just because I didn't enjoy it. Cutting/sewing the chiffon was a nightmare; it's one of those fabrics that I love to wear, but then I sit down to work with it and it frustrates me to no end. But I sucked it up. I figured that since it was just a bunch of rectangles it wouldn't be too bad. Well, it's not easy to cut any shape out of slippery chiffon (which I knew going into the project, but that still doesn't make it any easier to actually do). Then, after I started cutting, I realized I wasn't going to have enough fabric to make the front panels and sleeves quite as big as I wanted. No biggie, I just cut them a little smaller and dealt with it. Then, even though this kimono was going to be reversible with no exposed seams, I had the *genius* idea to use french seams for a super professional finish. So I had to sew each seam twice, and since it is reversible, I had to do them on each of the two kimonos. UGH. This greatly increased the amount of time it took me to sew the whole thing together, turning what could have been a quick and easy project into a long(er), more dreadful one. But I finally got it finished, and I don't know, it just doesn't wow or excite me. Yes, it's a kimono, it's reversible, and I like the prints, but I look at it and I just think "meh." I am happy with the construction; I think most of my dissatisfaction is with the fact that I want it to be longer in the front. I don't know, I'm going to give it a few weeks and wear it some and see if it grows on me. 
DIY Reversible Kimono Refashion from Dress - front side 1 by Hey, it's SJ
I didn't get very many (good) photos of this make because it was crazy windy the day I decided to take pictures and of course chiffon + wind = impossible to photograph. I did get some good outtakes though!
DIY Reversible Kimono Refashion from Dress - outake 2 by Hey, it's SJ
DIY Reversible Kimono Refashion from Dress - outake 1 by Hey, it's SJ
And I even got this one with the cows grazing in the background. (I also didn't pick the best time of day, and the lighting was less than desirable.) Still a pretty unique picture, I think!
DIY Reversible Kimono Refashion from Dress - with cows by Hey, it's SJ
I really don't want to discourage anyone from making one of these; I think with a different fabric choice and enough fabric to make it the way I wanted I would absolutely love this project, and to prove it to myself I will probably give it another try. In the meantime, I think this one will be nice to wear on these cool but not cold, transitional fall days.
DIY Reversible Kimono after by Hey, it's SJ
Now, I'm curious to know, which side do you like better? The one with the circle-y things, or the one that's just lines? Also, would anyone be interested in a more detailed tutorial about the reversible part? I'm thinking about writing one up, with diagrams and everything!

I am also sharing this project over on Refashion Co-Op. Here's the link to check it out, if you so desire.

Potential Project Tuesday, Vol. 1 // A Raincoat

September 30, 2014

Last week was pretty much all clouds and rain here, and as I was getting my things together to leave my Wednesday night class, I had this conversation with myself:

"Man, this lightweight, waterproof jacket is so functional."
"It really is ugly, though. I wish I had a cuter one."
"Oooh, I want a pink one! No, a printed one! A polka dot one! Better yet, plaid!"
"I could totally make one, I would just need the right pattern and fabric. I'm going to look into it when I get home."

Once I got home, I started searching through online pattern catalogs and trying to source fabrics, and I realize I do this all.the.time. I'll find inspiration from ready-to-wear clothes/accessories/decor or wandering thoughts like the ones above, I'll research everything I need to make it, sometimes I will even buy some of the supplies, and then I won't have time to get around to it for weeks/months/years, if at all. Then, if I do finally get around to working on the project, I have to track down the pattern and fabric sources AGAIN because it has been so long since I first found them. I waste all that time researching and sourcing and the idea just floats around in my head. So, I have decided to start a new blog series, Potential Project Tuesday, where I can get all of my ideas down on "paper" and have a resource when I do get around to the project. It may also serve as inspiration for you if you are looking for a new project and need ideas, making it a win-win for us both! Here are the ground rules:

  • I might not have a potential project every Tuesday, but I'm aiming for at least bi-weekly
  • The series will probably focus mostly on garments, but some accessories/decor items may creep in, too
  • Each post will contain my inspiration, 3 potential patterns, and 3 potential fabrics. I feel like 3 is a good number that gives some different options, but limits me so it's not overwhelming (and when it comes to me and fabric, things can get out of hand very quickly, so I think it's good to have a place to make me stop).

Anyway, without further ado, the first Potential Project Tuesday, a lightweight, waterproof rain jacket!

Inspiration

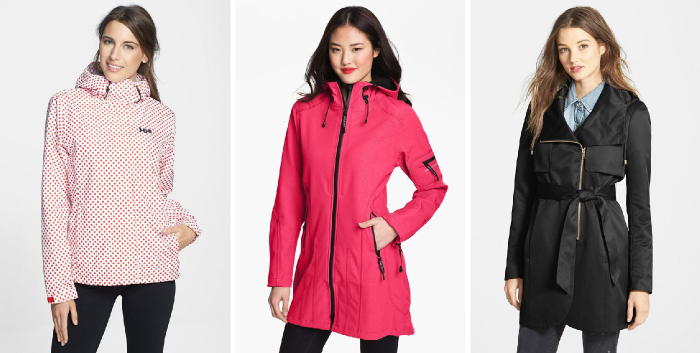
Replacing my current ugly one (see above). My current jacket is a short, sporty one like the first image, but after looking around online at some other jackets I kinda like the idea of a longer, dressier, trench length one.
PPT Vol. 1 // A Raincoat - Inspiration by Hey it's SJ
From left to right: Helly Hansen (via Nordstrom)
Ilse Jacobsen (via Nordstom)
French Connection (via Nordstrom)

Patterns

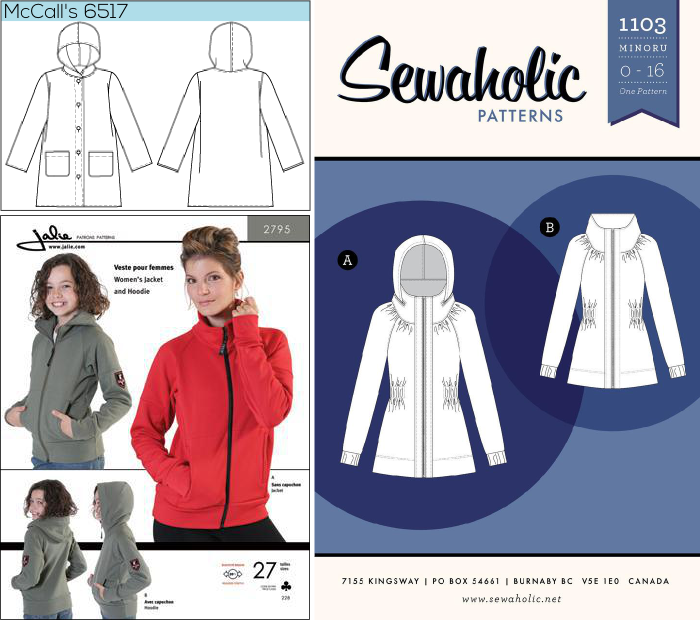
McCall's 6517: This is a more classic take on a raincoat. I don't love the button front, but I like the length, the sash (not pictured), and it has front pockets.

Sewaholic Minoru: I love that this pattern has a zip front and a hood, but I think my favorite part is that the hood can be hidden in that awesome wide collar! I also think the ruching would be very flattering. I would definitely have to figure out a way to add front pockets, though.

Jalie 2795: This is obviously a sporty, windbreaker style. The pattern is written for stretch fabrics, but I think with a few minor tweaks it could be easily made in a non-stretch fabric.

PPT Vol. 1 // A Raincoat - Patterns by Hey it's SJ


Fabrics

Sport Nylon in Royal Blue: If ya'll don't know by now, I have a serious soft spot for royal blue. I think the Minoru jacket would look uh-mazing in this color.

Polyurethane Laminate in Black: This is a more classic raincoat fabric and has a bit of a sheen in real life. While making it up in the McCall's pattern may be a bit on the boring side, it's sure to be a classic jacket that would never go out of style. 

Diagonal Waves Waterproof and Breathable Polyester: A jacket in this fabric would definitely be a statement piece! I know it's a little loud, but I love the colors and the abstract plaid print. I think this fabric would work for any of the patterns as long as you aren't scared to stand out in a crowd.

PPT Vol. 1 // A Raincoat - Fabrics by Hey it's SJ

So are you feeling inspired?! Do you have a favorite raincoat pattern or one that you are dying to try out? I think that royal blue Minoru is calling my name, but I have a ton of projects in the line up that I need/want to get to first.